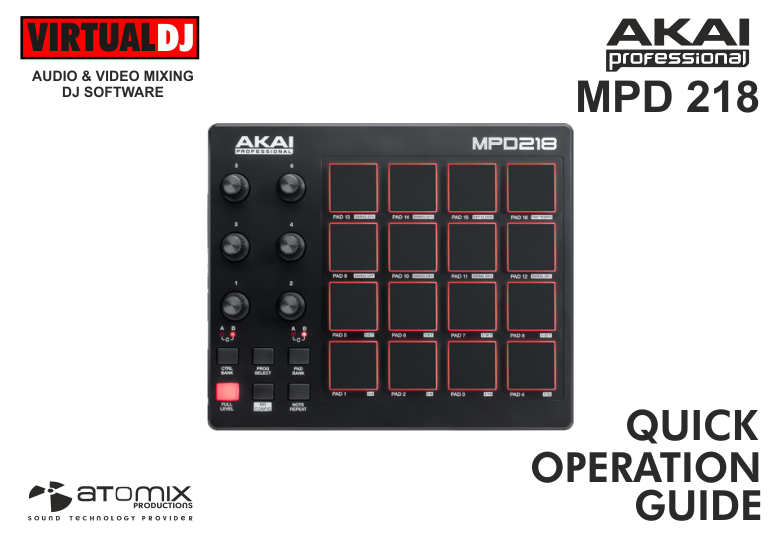
AKAI MPD218
SETUP
No driver software is required for the AKAI MPD218 to be installed. The device is a USB class compliant and your Operating System will auto-install the necessary driver when connected with a USB cable.
VirtualDJ Setup
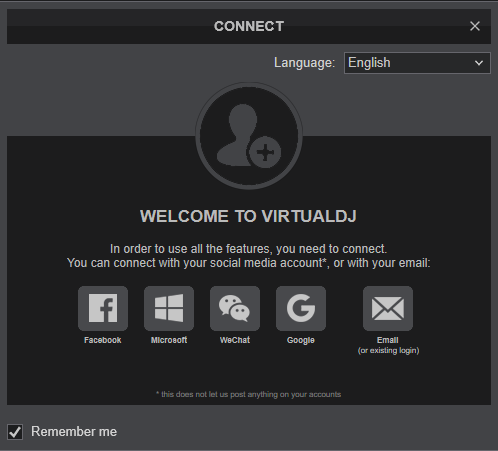
Once VirtualDJ is launched, a Connect Window will appear. Login with your virtualdj.com account credentials. A Pro Infinity, a Home Plus or a Pro Subscription License is required to fully use the AKAI MPD218.
Without any of the above Licenses, the controller will operate for 10 minutes each time you restart VirtualDJ.
http://www.virtualdj.com/buy/index.html
Click to OK.
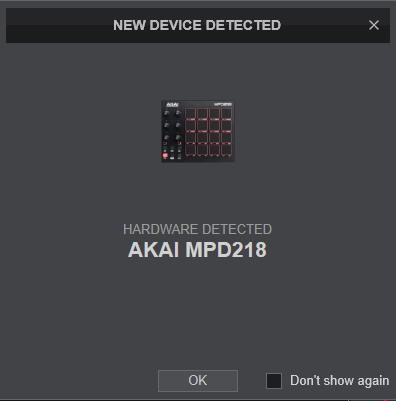
The unit is now ready to operate.
MIDI Operation
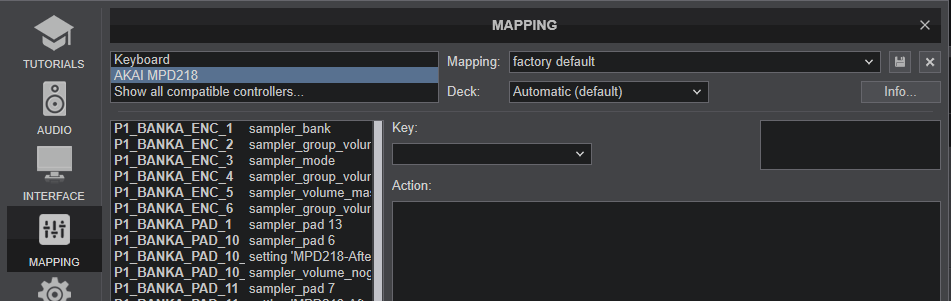
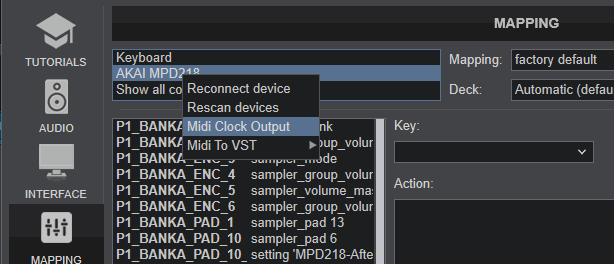
The unit should be visible in the MAPPING tab of VirtualDJ Settings and the “factory default” available/selected from the Mappings drop-down list. The factory default Mapping offers the functions described in this Manual, however those can be adjusted to your needs via VDJ Script actions.
Find more details at http://www.virtualdj.com/wiki/VDJ8script.html
For further software settings please refer to the User Guide of VirtualDJ. http://www.virtualdj.com/manuals/virtualdj8/index.html
CONTROLS
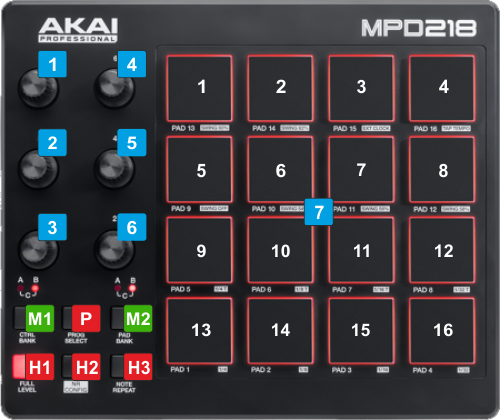
KEY
ACTION
In Effects mode : Adjust the 1st Parameter of the selected Effect for Left Deck
In Pads mode : Select previous/next Pads page for the Left Deck
In Effects mode : Adjust the 2nd Parameter of the selected Effect for Left Deck
In Pads mode : Adjust the 1st Parameter of the selected Pads page for the Left Deck
In Effects mode : Adjust the 3rd Parameter of the selected Effect for Left Deck
In Pads mode : Adjust the 2nd Parameter of the selected Pads page for the Left Deck
In Effects mode : Adjust the 1st Parameter of the selected Effect for Right Deck
In Pads mode : Select previous/next Pads page for the Right Deck
In Effects mode : Adjust the 2nd Parameter of the selected Effect for Right Deck
In Pads mode : Adjust the 1st Parameter of the selected Pads page for the Right Deck
In Effects mode : Adjust the 3rd Parameter of the selected Effect for Right Deck
In Pads mode : Adjust the 2nd Parameter of the selected Pads page for the Right Deck
In Single Effects mode :
Pad 1/9 : Triggers the selected Effect on the Left/Right Deck. If FX Temp is enabled (Pad 8/16) the Effect will be activated while the Pad is pressed (temporary)
Pad 2/10 : Selects the previous available Effect of the Left/Right Deck.
Pad 3/11 : Selects the next available Effect of the Left/Right Deck.
Pad 4/12 : Toggles between the Single FX mode (LED Off) and the Multi FX mode (LED On) for the Left/Right Deck.
Pad 5/13 : Controls the 1st FX button (if available) of the selected Effect for the Left/Right Deck.
Pad 6/14 : Controls the 2nd FX button (if available) of the selected Effect for the Left/Right Deck.
Pad 7/15 : Controls the 3rd FX button (if available) of the selected Effect for the Left/Right Deck.
Pad 8/16 : Toggles FX Temp mode for the Left/Right Deck. Effects will be triggered temporary when enabled (LED On)
In Multi Effects mode :
Pad 1/9 : Triggers the selected Effect in FX Slot 1 on the Left/Right Deck. If FX Temp is enabled (Pad 8/16) the Effect will be activated while the Pad is pressed (temporary)
Pad 2/10 : Triggers the selected Effect in FX Slot 2 on the Left/Right Deck. If FX Temp is enabled (Pad 8/16) the Effect will be activated while the Pad is pressed (temporary)
Pad 3/11 : Triggers the selected Effect in FX Slot 3 on the Left/Right Deck. If FX Temp is enabled (Pad 8/16) the Effect will be activated while the Pad is pressed (temporary)
Pad 4/12 : Toggles between the Single FX mode (LED Off) and the Multi FX mode (LED On) for the Left/Right Deck.
Pad 5/13 : Selects the next available Effect in FX Slot 1 for the Left/Right Deck.
Pad 6/14 : Selects the next available Effect in FX Slot 2 for the Left/Right Deck.
Pad 7/15 : Selects the next available Effect in FX Slot 3 for the Left/Right Deck.
Pad 8/16 : Toggles FX Temp mode for the Left/Right Deck. Effects will be triggered temporary when enabled (LED On)
In Pads mode : Trigger the Pads of the selected Pads page. Pads 1 to 8 trigger the Pads for Left Deck. Pads 9 to 16 trigger the Pads for Right Deck. See Pads in VirtualDJ Manual for further details
ADVANCED SETUP
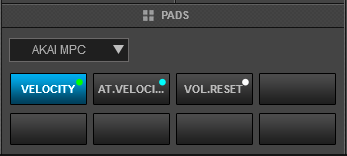
VELOCITY
The 16 PADS offer Velocity and After-Touch Velocity and is pre-defined and used in Sampler mode to control the Volume of the triggered Sample.
In Velocity, the Volume of the Sample is determined by the initial pressure applied to the Pad when pushed.
In After-Touch Velocity, the Volume of the Sample is continuously affected by the applied pressure, as long as the Pad is pushed.
Both Velocity and After-Touch Velocity are disabled by default. Select the special AKAI MPD Pads Page (available only when the unit is connected) on any deck to enable/disable them. Use the 3rd Pad in the Page to reset the Volumes of all Samples to 100% (useful when Velocity is disabled and Volumes are left to 0% on release)
MIDI CLOCK
While the REPEAT (H3) button is pressed the 16 PADS repeatedly trigger their assigned actions based on a Tempo that can be defined using an Internal or External MIDI Clock.
To toggle between Internal and External MIDI-Clock, hold down the NR CONFIG (H2) button and use PAD Nr.15.
In Internal MIDI-Clock (LED of PAD Nr.15 is Off) , the triggered actions are repeated based on a manual tempo (tap NR CONFIG + PAD Nr.16)
In External MIDI-Clock (LED of PAD Nr.15 is On) , the triggered actions are repeated based on the Tempo sent by VirtualDJ (comes from the Master Deck). In order VirtualDJ to send MIDI-Clock to the device, it needs to be enabled from the Controllers tab of Settings by right-clicking on the MPD218.
Hold NR CONFIG button down and then press PADS 1 to 8 to select a smaller time interval for each repeat (1/4 is selected by default).
Hold NR CONFIG button down and then press PADS 10 to 14 to select a Swing percentage or PAD Nr.9 to turn Swing Off (default)
